


Chapter 10
How to Make an Ear Wire
Earwire? Nothing could be easier!
It's so incredibly easy to make your own solid sterling silver or gold-filled earwires, so why not? And they make your earrings look great! There's nothing like hand-crafted earwires to really make people sit up and take notice, and I'm NOT kidding!
For purposes of illustration, I drew the ear-wires in the above graphic quite a bit short of what I normally do, which is to give a very generous length of wire to the ear, so that the earring is less likely to get separated from its host or hostess earlobe. Exactly how you wind up with an earwire is a mystery that I'm only too happy to lay bare. It's not in the secrets of the craft, it's in the execution.
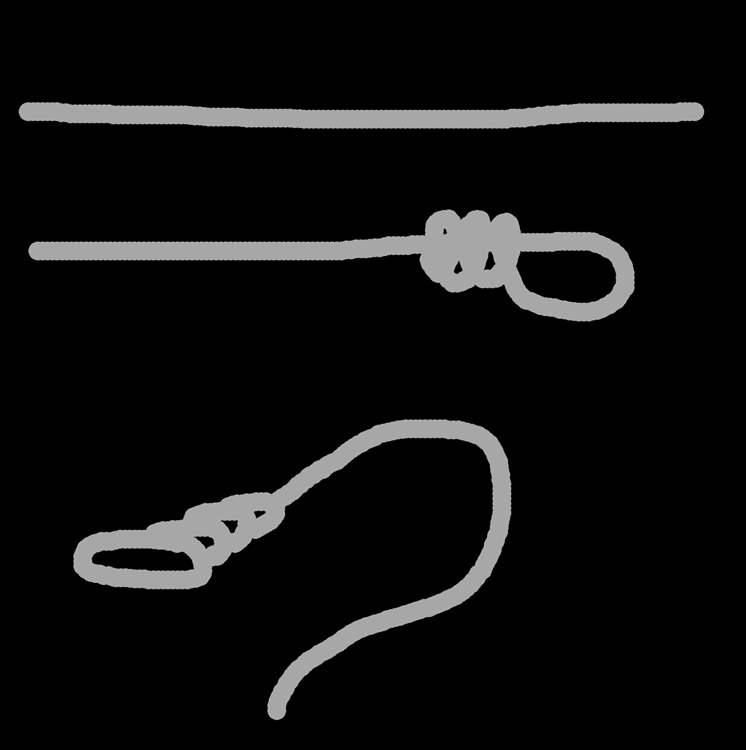
As you see in the illustration above, you start with a piece of straight wire -- for me, a length of about ten inches is good -- that gives me at least two earrings, so cut a ten inch in two, and you have two lengths that more or less match.
Now then...using your needlenose pliers, gently COAX the wire into a loop about an inch and a half, maybe 40mm, from the end of the wire. This needn't be a flush cut end, because you'll be cutting it again anyway in the next procedure.
Okay, you have a single loop about an inch and a half into the wire. STOP!!!
PAY PARTICULAR ATTENTION NOW:
Before you take the next step, BE SURE TO PUT THE EARRING INTO THE LOOP YOU JUST MADE. Is it snugly in there? Can it dingle and dangle? Is it freeling moving? If not, the loop is too small, too STINGY with the precious metals. Give them more room if needed, by enlarging the loop GENTLY with the needlenose pliers. Be careful not to dent or injure the wire as you perform this task.
Is the item in there? Good. Now holding the LOOP of wire GENTLY by the slightly thicker middle part of your needlenose pliers, COAX the wire around and around the long part of the wire for THREE or FOUR complete loops, ending at a 90 degree angle from the loop.
As closely as possible without cutting any other part, FLUSH CUT the winding end of the wire wherever it will do the least harm. I like to cut at a direct right-angle, 90 degrees, but it's up to you.
BUFF the end of the wire where it feels sharp. Take the time to FEEL the whole thing and determine if there is anything that could cut or scratch or grab an expensive cashmere jacket and bring it down into a heap of mangled yarn.
NOW you can form the main part of the earwire into a GENTLE and GRACEFUL curve, finishing with an uptick at the very end, if you wish, just about 10mm worth of uplift against the curve, and this is strictly optional, a matter of taste, how you finish or shape the earwires, or how long they will be, except for this very valuable tip:
Hold one finished earwire against the other, then cut the LONGER of the two to match the shorter wire. You will soon learn to give yourself plenty of room there for length.
The end of the wire that goes into the earlobe needs to be buffed and polished really well, then wiped and hand-polished with a jeweler's polishing cloth for about a minute.
That's all there is to it. DO NOT make stand-alone earwires, always connect them directly to the piece, wire them in so they don't get separated, and make them part of the design.