


Chapter 20
How to Make Your Limited Edition Genuine 2,000 Year Old Egyptian 26th Dynasty Tube Bead Earrings For Only $19.95 a Pair!!!
Your Genuine Ancient Egyptian 26th Dynasty Tube Bead Copper Earring Set is strictly limited. Your set is one of only 35 sets total, made from this hoard of totally authentic guaranteed genuine ancient Egyptian Faience Tube Beads and modern copper.
PLEASE NOTE: Ancient Faience Tube Beads are DELICATE. They cannot be subjected to pressure, and are subject to damage from water, mis-handling and other environmental accidents. In this Project, you learn to deal with the fact that these ancient ceramic beads are very, very delicate and must be handled and worn with care.
Here's what you should have received in your kit -- check each item off this list to make sure you have everything you're supposed to have in the kit:
ALL THE WIRES IN THE COPPER KITS ARE .20 GAUGE COPPER WIRE. No other gauge is used in this copper earring kit. Some people report sensitivity to copper ear-wires, thus a set of surgical steel earwires is included. Do NOT use copper to make earwires unless you are sure that you are copper-tolerant. The OPTIONAL copper earwires are intended as an exercise in wire-crafting and are thus included in the kit.
The wires were ALL cut with one end flush. Bend the loop at the flush-cut end. The other end will be hammered to take the sharpness off the dangly tip.
Always save your copper clippings -- they are worth a little money, but you will be amazed at how fast the scrap adds up, even when your wires are pre-sized to fit the project requirements, and you need the practice so you can learn how to save your silver and gold scraps when you get to doing silver projects.
The tools required for this project are:
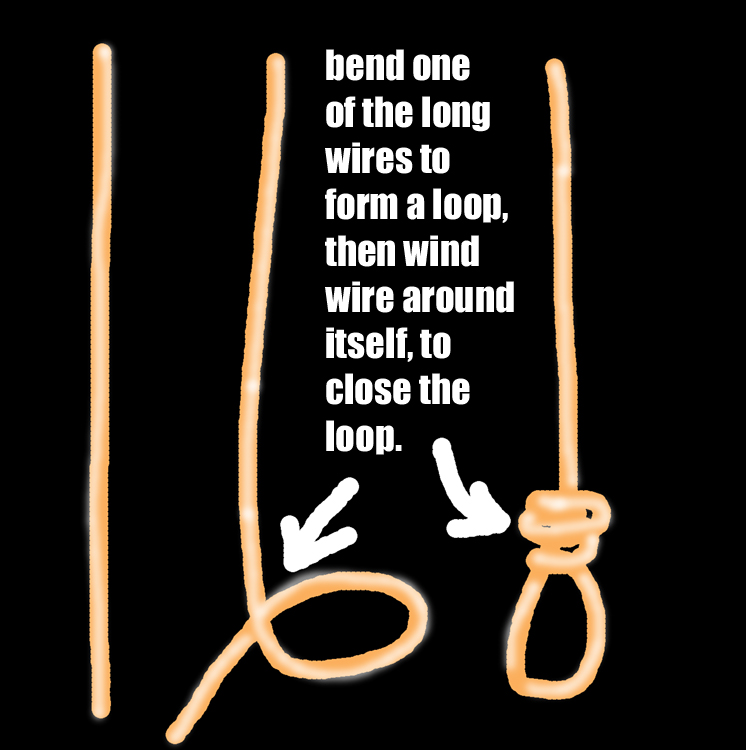
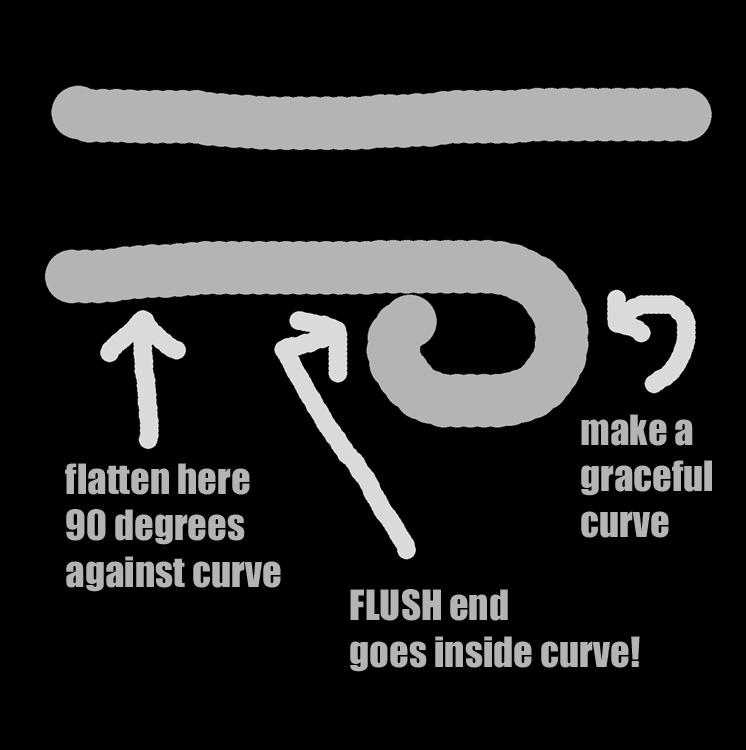
First we start with the Core Element. Make your Core with TWO of the .20 gauge copper wires provided in the kit. Take your time and make them right. Using your needlenose pliers, gently COAX the wire into the shapes you want them to be, and using your flush-cutters, trim the wire after making the loop and winding the wire back on itself, as shown above.
Make certain that there are no sharp points where you cut and trimmed the wire. Be sure to trim the wire so that the FLUSH side remains and the SHARP side is removed; keep the FLAT side of your flush-cutters to the FINISH or client-side of the wire. Feel the end to determine if you've done it right. If not, you'll have to trim it slightly once again, leaving less silver wire to work with, so be careful the first time.
Don't RUSH through the project; that's a sure way to louse it up. A few seconds won't make any dent in any endeavor.
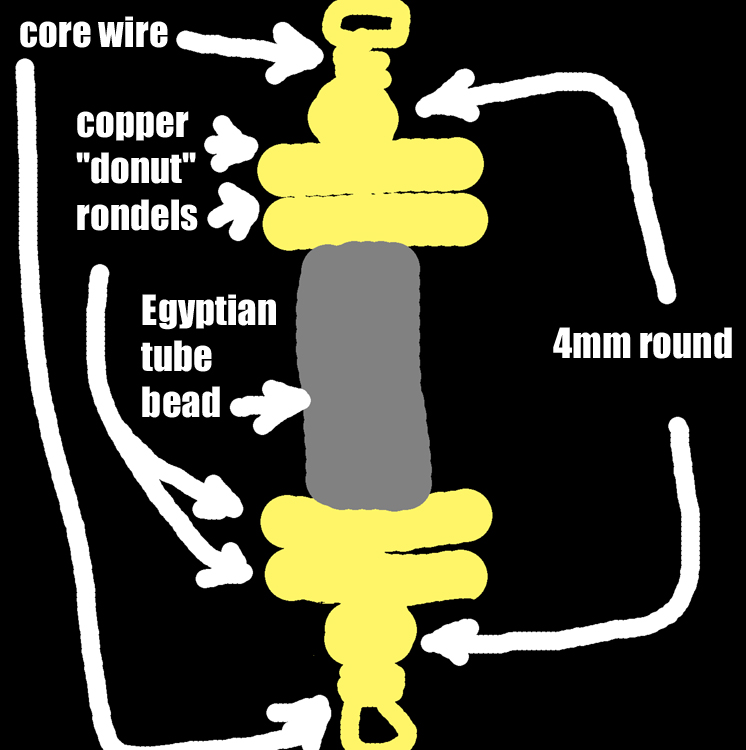
First load on one 4mm round copper bead, then one of the roundish donut-shaped copper beads, then your AUTHENTIC ANCIENT EGYPTIAN TUBE BEAD, then another donut-shaped copper bead, one 4mm round copper bead, then make a closing loop at the bottom of the Core element. Make BOTH Core Elements at this time, then proceed to the next stage.
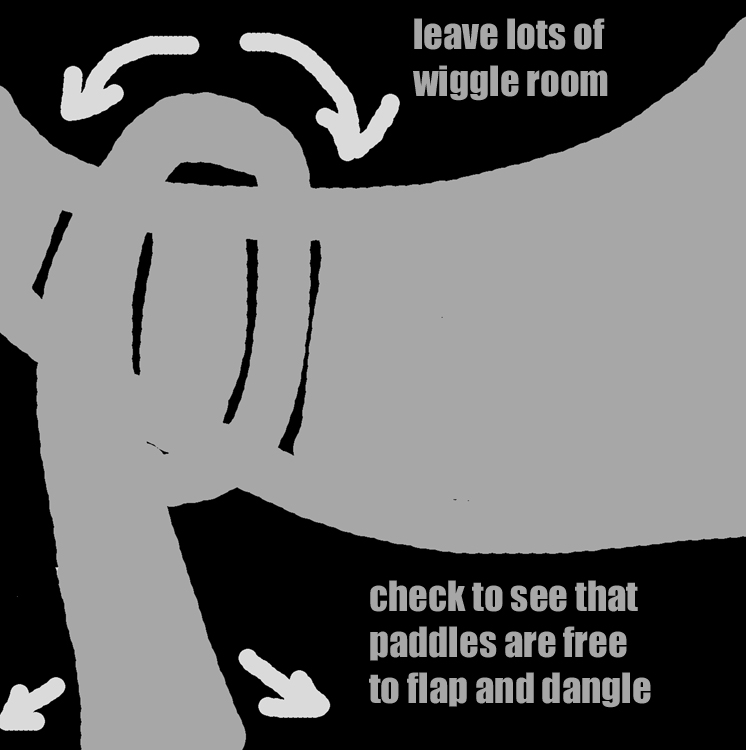
You are going to form the ear-wires directly onto the Core Element. Thread the .20 gauge wire through the top loop of the Core Element, so that about 40mm, or 1 1/2", sticks out the other end. Make a nice large loop, enough to allow good swing and tilt, and finish the loop by winding the wire back onto itself, as shown below:
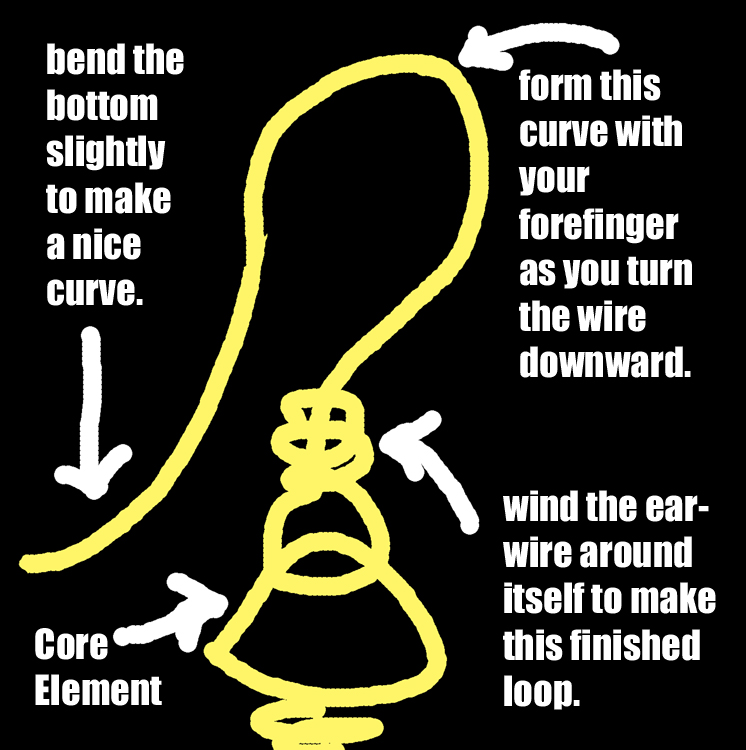
You should now have the ear-wires attached to the tops of the Core Elements on both earrings, and you're ready to to go the next step, where you'll make and attach your paddles, articulated bangle drops on the bottom of your earring elements, as follows:
Make your paddle bangles as indicated.
Open your packet of .20 gauge short copper wires. You only need 10, five for each earring. If you mess one up, you can use the scrap from the longer wires once they've been cut & trimmed properly, so don't worry -- you'll have enough wire. ALL scraps should be saved, and many of them will be long enough to make something out of it, once you know how.

Hold the paddle wire this way when you hammer the tip.
Working your way from the sharp tip toward the loop, hammer gently and let the weight of the 2 oz. hammer do all the work for you. Keep the flat of the hammer exactly even with the vise, anvil or steel strike-plate, so the silver doesn't get dinged from the edge of the hammer-head.
As you hammer the very end, you'll note that if you did it right, the sharpness will vanish, and the end will form a perfect tear-drop shape. Following the wire up toward the loop, GENTLY tap it to help it keep its shape. Do NOT flatten the wire except at the bottom, the formerly sharp end, which presumably now has a nice rounded tip with no sharp edges.
attach the paddles by opening and closing the top loop of the paddle.
Open the loop of the paddle to the SIDE, not outward. Do not make the loop larger by doing this operation. The loop stays the same size, and the end moves a bit to the left as you attach it to the bottom loop of the Core Element.
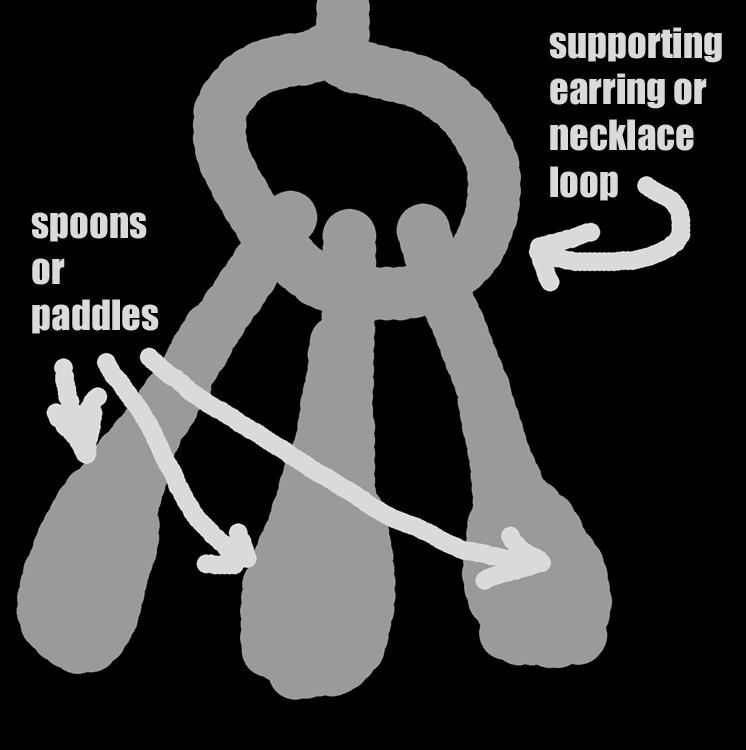
This is what it looks like when the paddles are attached correctly.
Try to get all the paddles facing the same way, if you can figure out how to do that, but don't worry over it, unless you're a fanatic for neatness. The paddles work either way they're put on, frontward or backward.
You'll put FIVE paddles on each earring, keeping back two for future use. Do not attempt to put six paddles on the bottom loop. It will look overcrowded, and three aren't enough to make a good flashpoint on the earring. Now check all the places on both earrings where sharp points might still be lurking, and polish them with a Dremel and some Green Jeweler's rouge, or GENTLY and SLOWLY file them down with your EXTRA-FINE or FINE rat-tail or ring file, taking care not to score the metal as you do this cleanup operation.
Congratulations! You have just made a DIRECT contact with your Parallel World Selves! Whether you wear your Genuine Ancient Egyptian Tube Bead Earrings or sell them as a kit, you will never forget this life-changing event in your present life.
LIMITED EDITION GENUINE ANCIENT EGYPTIAN TUBE EARRINGS KIT:
The complete kit with TWO GUARANTEED GENUINE ANCIENT EGYPTIAN TUBE BEADS and everything you need to make one pair of Ancient Egyptian Faience Tube Earrings in copper is made to retail at $19.95.
RETAIL ... $39.95/pair
WHOLESALE ... $19.95/pair
SOLD AS A KIT ONLY. Completed earrings are not included in this deal. If you are unable to make the completed piece, you can purchase one for display purposes but not for sale.